

This post contains paid and/or affiliate links. I make a small commission at no extra cost to you. Please see our Privacy Policy.
Forget fancy patisserie tricks—this is the pie your grandma made when she wanted applause without breaking a sweat. Creamy custard, buttery crust, and slices of ripe banana that taste like childhood—no gimmicks, just pure comfort.
One bite and you’ll get that “oh wow, this is dangerous” feeling. Make it once, and you’ll have friends and family “just stopping by” with suspiciously empty plates.
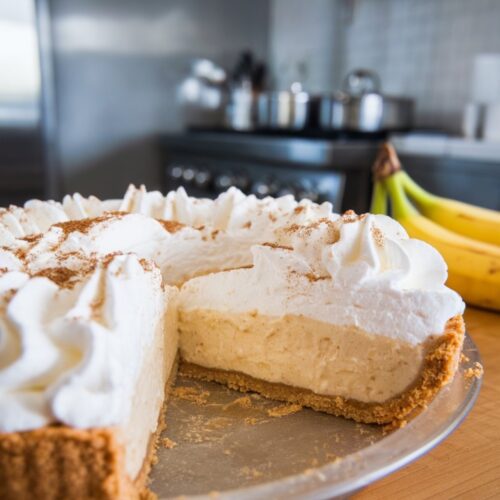
Indulge in the timeless comfort of a classic Banana Cream Pie, the perfect old-fashioned dessert for any holiday gathering. With its flaky homemade crust, layers of fresh bananas, silky vanilla custard, and a cloud of whipped cream on top, this pie is both nostalgic and irresistibly delicious. Easy to prepare yet elegant on the table, it’s a crowd-pleasing favorite that brings warmth and tradition to every celebration.
Whether you’re serving it at Thanksgiving, Christmas, or any special occasion, this Banana Cream Pie is sure to become a cherished holiday tradition in your home.
Why This Recipe Works
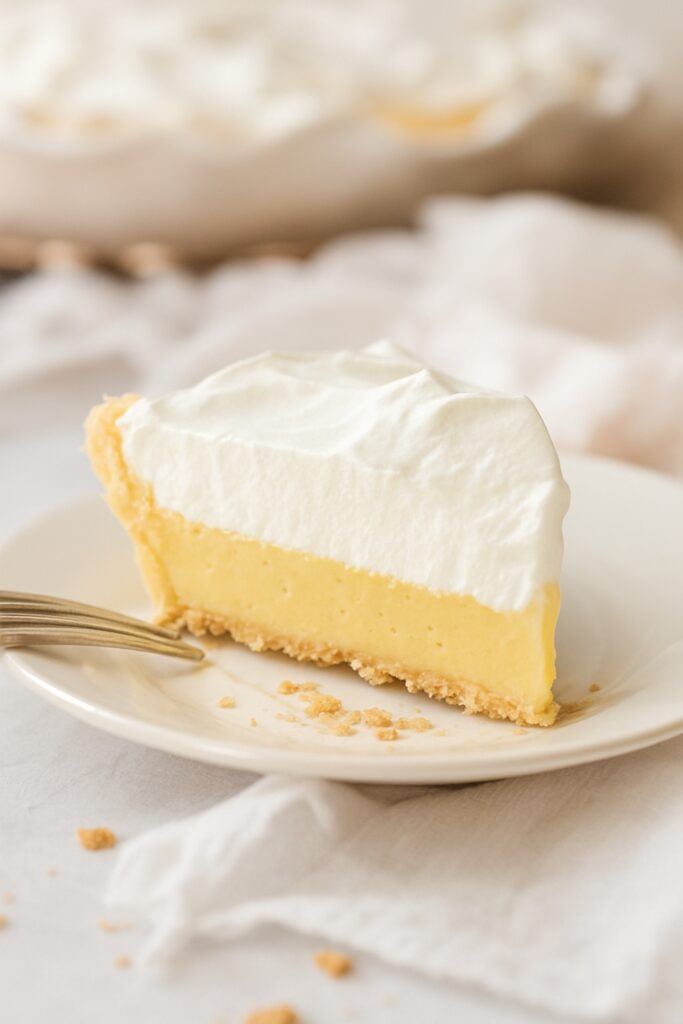
This banana cream pie nails the balance of textures: a crisp, flaky crust under a silky, vanilla-rich custard and fresh banana slices. The custard uses egg yolks and cornstarch for a thick, stable filling that slices cleanly without being rubbery.
A touch of butter and vanilla at the end adds richness and rounds out flavor. And yes, we layer the bananas, not mash them—so you get actual banana in every bite, not a mysterious mush.
We also stabilize the whipped cream topping with a little powdered sugar and vanilla. No weeping, no sad collapse.
Just a glossy, cloud-like cap that holds up in the fridge. Your future self will thank you when you sneak a slice at 10 p.m.
What You’ll Need (Ingredients)
- For the crust:
- 1 9-inch pie crust (homemade or store-bought), fully baked and cooled
- For the custard filling:
- 2 cups whole milk
- 1/2 cup granulated sugar
- 1/4 cup cornstarch
- 1/4 teaspoon fine sea salt
- 4 large egg yolks
- 2 tablespoons unsalted butter
- 2 teaspoons pure vanilla extract
- For the bananas:
- 3–4 ripe but firm bananas (no mushy, brown collapse bananas, please)
- 1 teaspoon lemon juice (optional, to slow browning)
- For the whipped cream topping:
- 1 cup heavy whipping cream, cold
- 3 tablespoons powdered sugar
- 1 teaspoon vanilla extract
- Optional garnishes:
- Toasted coconut flakes, chocolate shavings, or crushed vanilla wafers

The Method – Instructions
- Bake the crust. Blind bake your 9-inch crust according to package or recipe instructions. It should be golden and fully set.Cool completely. A warm crust + custard = soggy regret.
- Make the custard base. In a medium saucepan, whisk together sugar, cornstarch, and salt. Add milk gradually, whisking until smooth.In a separate bowl, whisk the egg yolks.
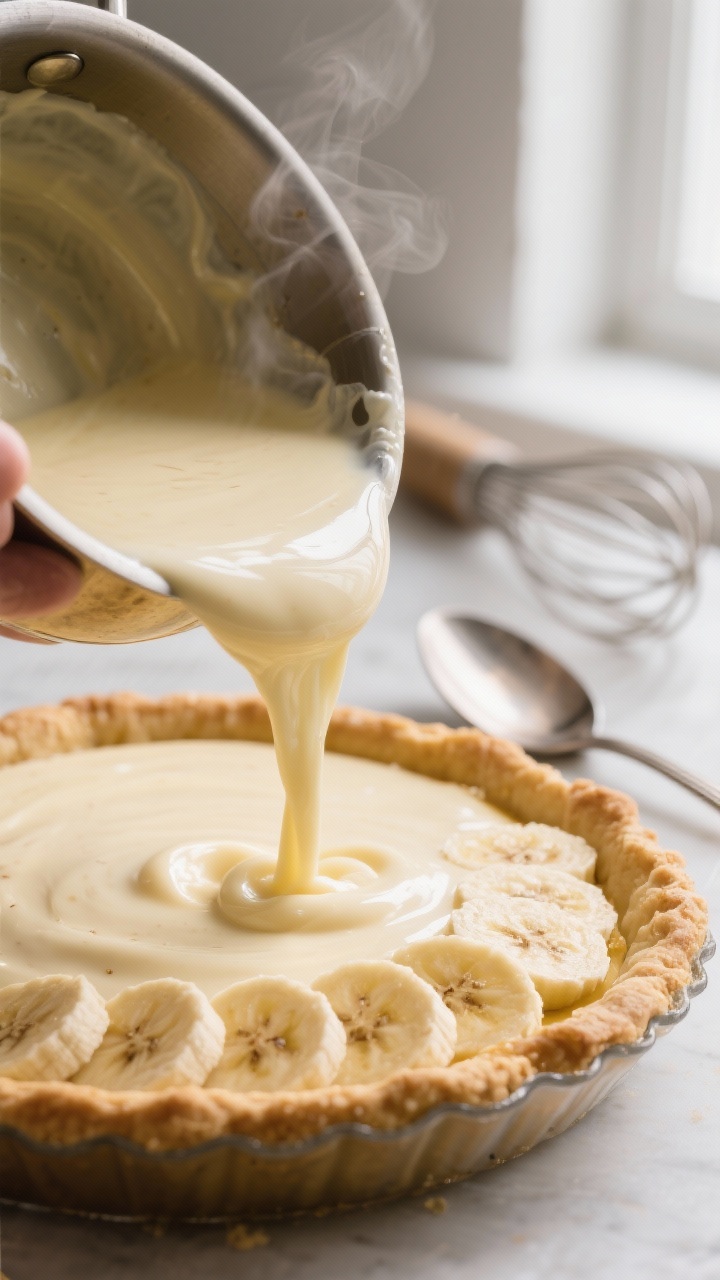
- Temper the yolks. Heat the milk mixture over medium, whisking constantly, until it begins to steam and thicken slightly. Slowly drizzle about 1/2 cup of the hot milk into the yolks while whisking. Then pour the yolk mixture back into the pan.
- Thicken the custard. Continue cooking over medium heat, whisking nonstop, until it reaches a thick, pudding-like consistency and bubbles lazily—about 2–4 minutes.Remove from heat and whisk in butter and vanilla. The custard should coat a spoon and hold a line when you drag a finger through it.
- Cool it fast. Transfer custard to a bowl. Press plastic wrap directly on the surface to prevent a skin.Let it cool until just warm, not hot—about 20–30 minutes. FYI: Hot custard will steam the bananas and make them limp.
- Slice the bananas. Cut into 1/4-inch rounds. If you’re worried about browning, gently toss with lemon juice.Don’t soak them—just a whisper.
- Layer the pie. Arrange a snug layer of banana slices over the cooled crust. Spoon half the custard on top and smooth. Add a second layer of banana slices, then the remaining custard.Smooth the surface. You’re building flavor strata like a dessert geologist.
- Chill to set. Cover and refrigerate at least 4 hours (overnight is peak). This is where the magic—and the clean slices—happen.
- Whip the cream. Beat the cold cream, powdered sugar, and vanilla until medium-stiff peaks form.Think “holds shape,” not “butter.”
- Finish and serve. Top the chilled pie with whipped cream. Garnish with toasted coconut, chocolate shavings, or crushed wafers if you’re feeling extra. Slice with a sharp knife wiped clean between cuts.

Banana Cream Pie
Ingredients
For the crust:
- 1 9- inch pie crust homemade or store-bought, fully baked and cooled
- For the custard filling:
- 2 cups whole milk
- 1/2 cup granulated sugar
- 1/4 cup cornstarch
- 1/4 teaspoon fine sea salt
- 4 large egg yolks
- 2 tablespoons unsalted butter
- 2 teaspoons pure vanilla extract
For the bananas:
- 3 –4 ripe but firm bananas no mushy, brown collapse bananas, please
- 1 teaspoon lemon juice optional, to slow browning
- For the whipped cream topping:
- 1 cup heavy whipping cream cold
- 3 tablespoons powdered sugar
- 1 teaspoon vanilla extract
Optional garnishes:
- Toasted coconut flakes chocolate shavings, or crushed vanilla wafers
Instructions
- Bake the crust. Blind bake your 9-inch crust according to package or recipe instructions. It should be golden and fully set. Cool completely. A warm crust + custard = soggy regret.
- Make the custard base. In a medium saucepan, whisk together sugar, cornstarch, and salt. Add milk gradually, whisking until smooth. In a separate bowl, whisk the egg yolks.
- Temper the yolks. Heat the milk mixture over medium, whisking constantly, until it begins to steam and thicken slightly. Slowly drizzle about 1/2 cup of the hot milk into the yolks while whisking. Then pour the yolk mixture back into the pan.
- Thicken the custard. Continue cooking over medium heat, whisking nonstop, until it reaches a thick, pudding-like consistency and bubbles lazily—about 2–4 minutes. Remove from heat and whisk in butter and vanilla. The custard should coat a spoon and hold a line when you drag a finger through it.
- Cool it fast. Transfer custard to a bowl. Press plastic wrap directly on the surface to prevent a skin. Let it cool until just warm, not hot—about 20–30 minutes. FYI: Hot custard will steam the bananas and make them limp.
- Slice the bananas. Cut into 1/4-inch rounds. If you’re worried about browning, gently toss with lemon juice. Don’t soak them—just a whisper.
- Layer the pie. Arrange a snug layer of banana slices over the cooled crust. Spoon half the custard on top and smooth. Add a second layer of banana slices, then the remaining custard. Smooth the surface. You’re building flavor strata like a dessert geologist.
- Chill to set. Cover and refrigerate at least 4 hours (overnight is peak). This is where the magic—and the clean slices—happen.
- Whip the cream. Beat the cold cream, powdered sugar, and vanilla until medium-stiff peaks form. Think “holds shape,” not “butter.”
- Finish and serve. Top the chilled pie with whipped cream. Garnish with toasted coconut, chocolate shavings, or crushed wafers if you’re feeling extra. Slice with a sharp knife, wiped clean between cuts.
How to Store
Keep the pie covered in the refrigerator for up to 3 days.
The bananas may darken slightly, but the flavor stays great. For best texture, add the whipped cream within 2–3 hours of serving, or whip it fresh right before. Avoid the freezer—custards tend to separate and bananas go weirdly spongy.
Not the vibe.
What’s Great About This
- Fast win: The custard is simple and made on the stovetop in minutes.
- Texture heaven: Crisp crust, creamy filling, fresh banana—no one is bored here.
- Old-school flavor: Vanilla, butter, and bananas. Nostalgia with better execution.
- Flexible: Use a classic pastry crust or a graham cracker or Nilla wafer crust. Your kitchen, your rules.
- Make-ahead friendly: Assemble in the morning; crown with whipped cream before dessert time.
Pitfalls to Watch Out For
- Runny custard: If you don’t cook it long enough post-tempering, it won’t set.Wait for distinct thickening and a slow bubble.
- Soggy crust: Always fully bake and fully cool the crust. Consider a light brush of melted chocolate to seal it if you’re extra cautious.
- Banana soup: Don’t add hot custard over the bananas. Warm is fine; hot is not.
- Weepy topping: Use powdered sugar in the whipped cream.It helps stabilize. And don’t overwhip—grainy cream is tragic.
- Overripe bananas: Save the freckled, super-soft ones for banana bread. You want ripe but firm for clean slices and fresh flavor.
Different Ways to Make This
- Graham cracker crust: Mix 1 1/2 cups crumbs with 1/4 cup sugar and 6 tablespoons melted butter; press and bake at 350°F for 8–10 minutes.
- Nilla wafer base: Same method as graham crackers, but with crushed vanilla wafers for a nostalgic twist.
- Coconut banana cream: Swap 1 cup of milk for full-fat coconut milk, and top with toasted coconut.
- Chocolate-lined crust: Brush the baked crust with melted dark chocolate and let set before filling.Flavor and moisture barrier? Yes, please.
- Stabilized whipped cream: Add 1 teaspoon unflavored gelatin bloomed in 1 tablespoon cold water and melted, then stream into whipping cream for ultra-long hold. IMO, great for parties.
- Gluten-free: Use a gluten-free crust and ensure cornstarch and flavorings are certified GF.
- No-egg variation: Use 2 1/2 cups milk and increase cornstarch to 6 tablespoons; omit yolks.It’s more pudding-like but still tasty.
FAQ
Can I make the custard ahead of time?
Yes. Make it up to 2 days ahead, press plastic wrap on the surface, and refrigerate. Whisk briefly to smooth it before assembling the pie.
My custard is lumpy.
What did I do wrong?
Heat likely got too high or you paused whisking. Don’t panic—press it through a fine mesh sieve while hot. It’ll be silky again and no one will know.
Which bananas are best?
Choose bananas that are yellow with minimal brown spots—sweet but still firm.
Overripe bananas taste great but turn mushy and brown fast in the pie.
How do I avoid a soggy bottom?
Fully blind bake the crust and cool it. For extra insurance, brush the crust with a thin layer of melted chocolate or egg white, then bake 2 more minutes to set.
Can I use instant pudding instead of homemade custard?
You can, but the texture and flavor won’t be as luxurious. The homemade version takes only a few extra minutes and tastes like you care.
How long does it need to chill?
At least 4 hours, but overnight is ideal for clean slices.
If you rush it, it’ll taste great but look like a banana avalanche.
Can I make it dairy-free?
Use coconut milk or a rich almond/cashew milk and dairy-free butter. The texture will be slightly lighter, but still very good.
What if I don’t have cornstarch?
Use 6 tablespoons all-purpose flour instead, whisking thoroughly to avoid raw flour taste. Cook an extra minute to ensure it thickens properly.
Final Thoughts
This Banana Cream Pie is proof that simple, old-fashioned desserts still dominate.
The crust is crisp, the custard is lush, and the banana flavor hits exactly where you want it. It’s low drama with high payoff—ideal for holidays, potlucks, or Tuesdays that need a win. Make it, chill it, slice it, and watch it disappear.
Repeat as necessary (which, spoiler, will be often).
This post contains paid and/or affiliate links. I make a small commission at no extra cost to you. Please see our Privacy Policy.
Printable Recipe Card
Want just the essential recipe details without scrolling through the article? Get our printable recipe card with just the ingredients and instructions.